Essential Fly Fishing Knots: 10 Key Ties for Angling Success

As a beginner in the world of fly fishing learning to tie proper knots is one of the most critical skills you can develop to enhance your fishing experience and increase your catch. Mastering various knots is not just about landing bigger fish; it's a fundamental aspect of fly fishing that influences your success on the water. Strong, well-tied knots enable you to set up your gear efficiently and re-rig lost or tangled rigs quickly, allowing you to spend more time fishing and less time fiddling with your equipment. This skill ensures the durability of your setup and enhances your effectiveness in different fishing conditions.
At the heart of fly fishing lies the mastery of knot tying. The right knot can be the difference between a triumphant day and a disappointing one. In this blog post, we'll dive into 10 Essential Fly Fishing Knots, highlighting why practicing and perfecting these knots is crucial for every angler. Whether you are just starting or looking to refine your techniques, understanding and applying these knots will significantly contribute to your success and enjoyment in the rich and rewarding pursuit of fly fishing.
ARBOR KNOT – BACKING TO REEL ARBOR
The Arbor Knot is a fundamental and efficient knot specifically designed for attaching the backing to the fly reel arbor. It stands out for its simplicity and effectiveness in securely fastening the backing to the reel, a crucial task for any angler. The strength of the Arbor Knot lies in its ability to prevent the backing from slipping on the reel, ensuring that it remains firmly in place during the rigors of fishing. This secure attachment is vital as the backing provides the initial layer on the reel, upon which all other lines, including the fly line and leader, are subsequently added.

- Form a Loop: Start by tying an overhand knot at the end of your fishing line. This creates a basic loop. Don't tighten the knot completely just yet.
- Wrap Around the Reel Spool: Take the open end of your line (not the end with the overhand knot) and wrap it around the arbor (the central part) of your reel spool.
- Tie a Second Overhand Knot: Now, tie another overhand knot with the open end of the line. This second knot should be around both the standing part of the line (the main length of the line) and the tag end (the short piece sticking out).
- Slide Knots to the Reel: Gently pull on the standing line so that both knots slide down towards the reel spool. The first overhand knot should slide down and sit snugly against the reel spool, while the second overhand knot should tighten against the first.
- Trim Excess Line and Tighten: Once the knots are in place, trim any excess line from the tag end close to the second overhand knot. Then, pull the standing line to tighten everything securely. The Arbor Knot is now complete and your line is securely attached to the reel.
NAIL KNOT – BACKING TO FLY LINE OR FLY LINE TO LEADER
The Nail Knot is an indispensable element in fly fishing, primarily used for connecting the backing to the fly line and the fly line to the leader. Its standout feature is its slender, streamlined design, which ensures a smooth transition through the rod guides. This smoothness is crucial as it significantly reduces the chances of snags or breakages during casting and retrieving, a common issue with bulkier knots. The Nail Knot's sleek profile is particularly beneficial when a large fish strikes, requiring rapid and unimpeded line movement.
In addition to its sleek design, the Nail Knot is highly valued for its strength and reliability, making it a preferred choice among anglers. It forms a strong, secure connection, vital for maintaining the integrity of the line under the strain of a catch. Versatile enough to handle different diameters and types of lines, the Nail Knot excels in connecting thin, delicate fly lines to sturdy backings or attaching leaders for precise fly presentation. Its combination of smoothness, strength, and versatility makes the Nail Knot a fundamental knot in fly fishing, symbolizing efficiency and trust in securing crucial line connections.
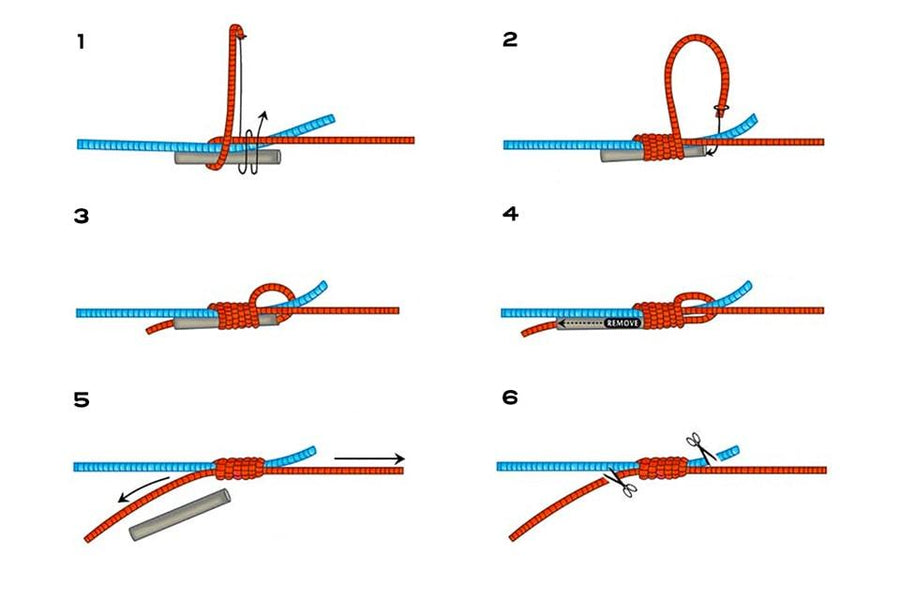
- Align the Nail and the Lines: Place a small tube or a nail against the end of the fly line. Then, lay about 10 inches of your leader line alongside the fly line and the nail.
- Create a Loop: Hold the fly line, leader, and nail together with one hand. With your other hand, make a small loop at the end of the leader that lies over the fly line and nail.
- Wrap the Leader: Wrap the long end of the leader back over itself, the fly line, and the nail, starting at the loop. Make about 5-6 tight, close wraps working away from the end of the fly line.
- Thread the End of the Leader: After wrapping, take the end of the leader and pass it through the loop that was initially made. Ensure it goes through the loop and under the wraps.
- Tighten the Knot: Hold both ends of the leader (both the long end and the end you just threaded through the loop) and carefully pull them to tighten the wraps around the fly line and the nail.
- Remove the Nail and Trim Excess: Slide the nail out from the knot. Pull the leader and the fly line in opposite directions to fully tighten the knot. Finally, trim the excess from the end of the leader close to the knot. Your Nail Knot is now complete, securely attaching your leader to the fly line.
LOOP TO LOOP CONNECTION – BACKING TO FLY LINE OR FLY LINE TO LEADER
The Loop to Loop Connection is an excellent and user-friendly alternative to the traditional Nail Knot for assembling various parts of a fly fishing setup. It stands out for its simplicity and speed, particularly useful for anglers who frequently switch their fly lines to suit different fishing conditions. This method involves easily interlocking pre-made loops at the end of the backing and fly line, making it a quick and efficient process that saves valuable time on the water.
Additionally, the Loop to Loop Connection is highly effective for attaching the fly line to the leader. Its ease of use is a boon for anglers needing to change leaders regularly due to varying fishing scenarios or natural wear and tear. Not only does it allow for quick leader changes, but it also maintains a strong and reliable connection, ensuring the integrity of the setup. The combination of its straightforward application, strength, and versatility makes the Loop to Loop Connection a popular choice among both novice and experienced fly fishers, significantly enhancing the overall angling experience.

- Prepare the Loops: Ensure both your fly line and backing have pre-made loops. Most modern fly lines come with a factory-made loop at the end. For the backing, if it doesn't already have a loop, you'll need to create one by tying a simple surgeon's loop or a perfection loop.
- Align the Loops: Hold the loop at the end of the backing and the loop at the end of the fly line so that they are facing each other. Pass the loop of the backing through the loop of the fly line.
- Complete the Connection: Now, take the end of your fly line (the longer part, not the loop end) and pass it through the loop of the backing. Gently pull the fly line and the backing in opposite directions to tighten. The loops will lock into place, securing the connection between the fly line and the backing. This method provides a strong, reliable, and smooth connection that will easily run through the rod guides.
PERFECTION LOOP KNOT – FLY LINE TO LEADER
The Perfection Loop Knot is an invaluable tool in fly fishing, primarily used for forming a loop at the end of the leader. Its greatest strength is the creation of a perfectly symmetrical and strong loop, which is essential for maintaining a smooth line flow. This quality is crucial for accurate casting, as it ensures a seamless transfer of energy from the fly line to the leader and ultimately to the fly, enabling precise and controlled fly placement.
Aside from its functional benefits, the Perfection Loop Knot is appreciated for its compact size and the neatness of the loop, reducing the chance of snagging and offering an aesthetically pleasing setup. The knot's streamlined design also helps in cutting down wind resistance, which is particularly beneficial in challenging casting conditions. Importantly, the knot's robustness ensures it can withstand the rigors of fishing, maintaining the leader's integrity during the sudden pulls and jolts of catching fish. Overall, the Perfection Loop Knot is a critical element for fly fishers, enhancing casting accuracy and the effectiveness of their fishing rig.

- Form a Loop: Take the end of your line and form a loop by bringing the tag end (short end) over the standing line (long end), creating a single loop.
- Make a Second Loop: Hold the base of the first loop between your thumb and forefinger. Then take the tag end and form a second smaller loop by laying it behind the first loop.
- Wrap the Tag End: Pass the tag end over the standing line and then back through the small loop you just made, effectively wrapping it around the standing line once.
- Pull the Tag End through the First Loop: Take the tag end and thread it through the initial, larger loop from the front to the back.
- Tighten the Knot: Hold the tag end and the standing line, and begin to pull them apart slowly. As you do this, the smaller loop will start to slide and tighten against the larger loop. Adjust the size of the loop as desired before it gets too tight. Once the loop is the size you want, pull the standing line firmly to fully tighten the knot. Trim any excess tag end if necessary. Your Perfection Loop Knot is now complete, creating a strong and reliable loop at the end of your line.
BLOOD KNOT – MONOFILAMENT TO MONOFILAMENT OR FLUOROCARBON
The Blood Knot is widely revered for its effectiveness in joining two pieces of monofilament or fluorocarbon line. This knot is widely regarded for its ability to seamlessly and securely connect lines of similar diameters, making it a go-to choice for anglers crafting or extending leaders and tippets. Its primary advantage is the strength and smoothness of the connection it creates, ensuring that the integrity of the line is maintained even under tension. This is particularly crucial in fly fishing where the consistency and reliability of the line play a significant role in the success of casting and landing fish.
In addition to its functional strength, the Blood Knot is favored for its slim profile. Unlike bulkier knots, the Blood Knot, once tightened, forms a neat and streamlined connection that reduces the likelihood of snagging on weeds or debris in the water. This slender profile also allows for easier passage through the rod guides, a subtle yet critical aspect that enhances the overall fishing experience. Whether used for connecting sections of the leader or for adding length to the tippet, the Blood Knot's combination of robustness, sleekness, and reliability makes it an essential knot in the arsenal of both novice and experienced fly fishers.

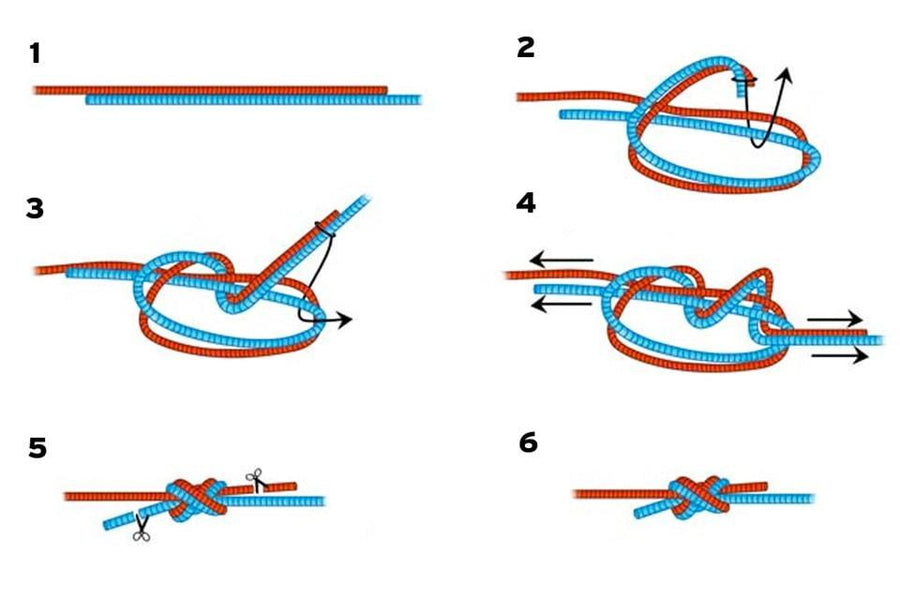
- Overlap the Lines: Start by overlapping the ends of the two lines you wish to join. Ensure you have enough length on each end for wrapping, typically about 6 inches.
- Wrap the First Line: Hold the overlap point with one hand. With the other hand, take the end of one line and wrap it around the other line about 5 times. These wraps should be neat and close together but not overlapping.
- Thread Through the Center: After wrapping, bring the end of this line back to the middle, threading it through the opening formed by the two lines at the overlap point. Leave this end poking out of the center for now.
- Wrap the Second Line: Switch to the other line. Repeat the wrapping process, wrapping this line around the first line, also about 5 times. Ensure these wraps are neat and in the opposite direction to the first set.
- Thread Back Through the Center: Like with the first line, thread the end of the second line back through the center opening, but in the opposite direction to the first line's end.
- Prepare to Tighten: You should now have both ends of the lines sticking out of the loop, going in opposite directions. Before tightening, moisten the knot with water or saliva. This reduces friction and allows for a tighter knot.
- Tighten the Knot: Gently pull on both ends of the lines while holding the knot to start tightening. Adjust as necessary to ensure the wraps come together neatly without overlapping or bunching improperly.
- Trim Excess Ends: Once the knot is fully tightened and secure, with the wraps neatly in place, trim the excess ends of the lines close to the knot to complete.
SURGEON'S KNOT – MONOFILAMENT TIPPET KNOTS
The Surgeon's Knot is a highly practical and efficient knot in the realm of fly fishing, particularly valued for its simplicity and effectiveness in joining two lines of slightly varying diameters. This characteristic makes it exceptionally useful for anglers looking to attach a tippet to a leader. Unlike some other knots that may require more intricate manipulations or struggle with diameter disparities, the Surgeon's Knot is straightforward and accommodating. Its ability to securely connect lines of different thicknesses without compromising strength or stability is a significant advantage, especially in situations where a quick knot is needed to adjust the length or taper of the leader.
Moreover, the Surgeon's Knot is known for its robustness and reliability under the stress of fishing. Once tied, it holds firmly, ensuring that the transition between the leader and the tippet remains intact even during the battle with a fish. The knot's design also contributes to a relatively low profile, reducing the chances of snagging and maintaining a smoother line flow through the rod guides. For fly fishers, particularly those who often find themselves adjusting their setup in the field, the Surgeon's Knot is a convenient and reliable choice. Its blend of ease-of-use, adaptability to different line diameters, and strong hold makes it an indispensable knot for effectively managing monofilament tippet adjustments.
For anglers seeking even greater strength and security, the Double Surgeon's Knot offers a reliable alternative. By passing the two lines through the loop twice instead of once, the Double Surgeon's Knot enhances the original design by adding an extra layer of reinforcement. This makes it particularly useful when connecting tippet to leader in situations where stronger tippet material or larger fish are expected. It maintains all the advantages of the traditional Surgeon's Knot, such as ease of tying and versatility, while offering superior durability and reliability, making it a preferred choice for many experienced anglers.
- Overlap the Lines: Lay the two lines against each other, overlapping them by several inches.
- Form a Loop: Create a single loop with both lines, as if you are beginning to tie a simple overhand knot.
- Wrap the Lines: Hold the loop with one hand. With the other hand, pass both ends of the lines through the loop. For a standard Surgeon's Knot, you will do this once. For a Double Surgeon's Knot, which is stronger, pass the ends through the loop twice.
- Moisten the Knot: Before tightening, moisten the knot with water or saliva. This reduces friction and allows the knot to tighten smoothly.
- Tighten the Knot: Gently pull on all four ends (two tag ends and two standing lines) to tighten the knot. Make sure it cinches down evenly.
- Trim Excess Ends: Once the knot is fully tightened and secure, trim the excess ends of the lines close to the knot.
UNI KNOT – MONOFILAMENT TIPPET KNOTS
The Uni Knot is known for its versatility and strength and is a standout choice in the world of fly fishing, particularly when working with monofilament tippet knots. This knot's adaptability allows it to be used for a multitude of connections, ranging from securing the fly to the tippet, attaching the tippet to the leader, or even joining the backing to the reel. Its versatility is matched by its strength, making it a reliable option for anglers who require a knot that can withstand the dynamic stresses of casting, retrieving, and battling fish.
What sets the Uni Knot apart is its simplicity and the ease with which it can be tied, even in challenging conditions on the water. This makes it a favorite among both novice and seasoned anglers. The Uni Knot maintains a strong grip on the line, preventing slippage, which is crucial when dealing with the elusive and sudden movements of fish. Its design also ensures that it doesn't significantly weaken the line, preserving the overall integrity of the fishing setup. The Uni Knot's ability to be adjusted before it's fully set allows for precise control over the tension and fit of the knot, ensuring optimal performance. Whether you are making quick adjustments to your rig or setting up for the first time, the Uni Knot offers a combination of ease, strength, and adaptability, making it an essential knot for any fly fishing enthusiast.

- Thread the Line: Pass the end of your line through the eye of the hook, lure, or swivel. Make sure to pull about 6 inches of line through the eye to work with.
- Create a Loop: Hold the hook with one hand and with the other hand, loop the tag end of the line parallel to the standing line, forming a circle over the standing line.
- Wrap the Tag End: Hold the loop where the lines intersect between your thumb and forefinger. Wrap the tag end around both the loop and the standing line. For lighter lines, make about 6-7 wraps, and for heavier lines, 3-4 wraps are sufficient.
- Moisten the Knot: Wet the knot with water or saliva. This reduces friction and allows the knot to tighten smoothly.
- Tighten the Knot: Slowly pull the standing line while holding the tag end to snug the wraps together. Slide the wraps down towards the eye while keeping them neatly stacked and not overlapping.
- Secure and Trim: Once the knot is snug against the eye, pull the standing line to fully tighten the knot. Then trim the excess tag end close to the knot.
DOUBLE UNI KNOT – MONOFILAMENT TIPPET KNOTS
The Double Uni Knot is highly esteemed among anglers for its reliability and effectiveness in connecting two fishing lines, particularly when they differ in diameter. This knot is an enhanced version of the Uni Knot, doubling the strength and security, making it an ideal choice for various applications in fly fishing. Whether it's for joining the leader to the tippet or attaching a thinner tippet to a thicker mainline, the Double Uni Knot excels in providing a robust and durable connection. Its ability to securely unite lines of varying thicknesses without compromising the integrity of the line is a crucial asset in fly fishing, where precision and strength are paramount.
One of the standout features of the Double Uni Knot is its straightforward tying process, which remains relatively simple despite its strength. This ease of tying is particularly beneficial when conditions are less than ideal, such as in windy weather or when quick line adjustments are needed on the water. The knot's design ensures a snug fit, reducing the chances of slippage and maintaining line strength under tension, which is often encountered during fishing. Additionally, the Double Uni Knot forms a sleek and compact connection, minimizing the knot's profile and reducing the likelihood of snagging in weeds or debris. This low-profile characteristic also ensures smoother passage through the rod guides, enhancing the overall fishing experience. For anglers seeking a dependable knot that can handle diverse line diameters and rigorous fishing conditions, the Double Uni Knot stands out as a top choice.

- Overlap the Lines: Begin by overlapping the ends of the two lines you wish to join. Ensure there's enough overlap for tying the knot, typically about 6 inches.
- Tie the First Uni Knot: Take one end of the line and form a loop over the other line. Wrap this end around both the loop and the standing part of its own line about 3-6 times (more wraps for thinner lines, fewer for thicker lines).
- Tighten the First Knot: Moisten the first knot with saliva or water. Then, pull the tag end to tighten the wraps, sliding the knot down to the end of the overlap. Don't tighten it all the way to the other line yet.
- Tie the Second Uni Knot: Repeat the process with the other line. Make a loop over the first line and wrap the tag end around both the loop and the standing part of its line 3-6 times.
- Tighten the Second Knot: Moisten this knot as well and then pull on its tag end to tighten the wraps, sliding it down towards the first knot.
- Pull Both Lines to Secure: Once both knots are formed and snugged down, pull on both standing lines simultaneously to slide the two knots towards each other. They will butt against each other and tighten securely.
- Check the Knots: Ensure that both knots are snug and secure, and there is no slippage when you pull on the lines.
- Trim the Excess Ends: Trim the tag ends of both lines close to their respective knots.
CLINCH KNOT – TIPPET TO FLY
The Clinch Knot holds a fundamental place in the toolkit of any fly fisher, renowned for its simplicity and effectiveness in attaching a fly to the tippet. This knot is a staple in the angling community, primarily due to its straightforward tying process that can be quickly mastered by beginners, yet it's reliable enough to be regularly used by experienced anglers. The ease with which it can be tied, even in adverse conditions such as windy weather or in a rocking boat, makes the Clinch Knot a favorite for those looking to efficiently and securely set up their line.
Beyond its simplicity, the Clinch Knot is celebrated for its strength and reliability. Once properly tied and tightened, it holds the fly firmly in place, ensuring that the connection remains secure even under the strain of a fighting fish. This strength is crucial for maintaining the integrity of the presentation of the fly, which directly impacts the success of catching fish. Additionally, the knot's compact size ensures it doesn't add unnecessary bulk or weight near the fly, allowing for a more natural and effective presentation in the water. The Clinch Knot's combination of ease of use, reliability, and minimal impact on the fly's presentation makes it an indispensable choice for connecting the tippet to the fly in a variety of fishing scenarios.

- Thread the Line: Begin by threading about 6 inches of your fishing line through the eye of the hook, lure, or swivel. This is your starting point.
- Wrap the Tag End: Hold the hook steady with one hand. With your other hand, wrap the tag end (the short end of the line that you just passed through the eye) around the standing line (the main length of the line). Make 5 to 7 wraps around the standing line. The rule of thumb is to use more wraps for thinner lines and fewer for thicker lines.
- Thread Through the First Loop: Once you have completed the wraps, thread the tag end through the small loop directly above the hook's eye. This step starts to form the knot.
- Moisten and Tighten the Knot: Before fully tightening the knot, moisten it with saliva or water. Moistening the knot is essential as it reduces friction, allowing the knot to tighten smoothly and preventing damage to the line.
- Tighten the Knot: Now, pull the standing line to begin tightening the knot. As you pull, the wraps should begin to coil neatly against the hook's eye without overlapping. It's important to ensure that the knot is tightened evenly.
- Trim the Excess Tag End: Once the knot is tight and secure, carefully trim the excess tag end close to the knot. This final step ensures that your Clinch Knot is neat and less likely to snag.
IMPROVED CLINCH KNOT – TIPPET TO FLY
The Improved Clinch Knot, often considered an enhanced version of the standard Clinch Knot, is a significant upgrade in terms of strength and reliability. This knot has gained widespread popularity among fly fishers for its ability to securely attach the tippet to the fly, especially when dealing with heavier flies or targeting larger fish. The additional twist and tuck in its tying process fortify the knot, ensuring a more secure hold that significantly reduces the likelihood of the knot giving way under tension. This added strength is crucial when fishing in situations where the catch is likely to put up a strong fight, or when the water conditions demand a more robust setup.
The beauty of the Improved Clinch Knot lies in its balance between increased strength and the ease of tying. Despite its enhanced security, the knot remains relatively simple to tie, making it accessible to anglers of all skill levels. This ease of tying is particularly valuable in the field, where quick and efficient knot tying is often necessary. The knot's design also ensures that it remains compact, minimizing its impact on the fly's presentation and movement in the water. The Improved Clinch Knot's ability to provide a stronger and more reliable connection without adding bulk or complexity makes it a preferred choice for anglers, particularly when the situation calls for extra security in attaching larger or heavier flies to the tippet.
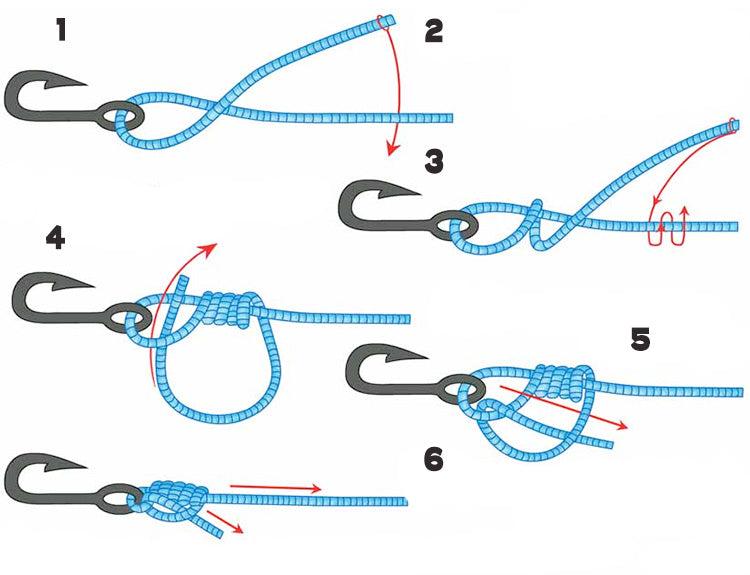
- Thread the Line: Pass about 6-8 inches of line through the eye of the hook, lure, or swivel.
- Wrap the Tag End Around the Standing Line: Hold the hook steady, and with the other hand, wrap the tag end around the standing line 5-7 times. The number of wraps depends on the thickness of the line: more wraps for thinner lines and fewer for thicker lines.
- Pass the Tag End Through the Small Loop: After wrapping, bring the tag end back towards the hook and pass it through the small loop just above the hook's eye.
- Pass the Tag End Through the Larger Loop: Next, pass the tag end through the larger loop that was just created by the previous step.
- Moisten and Tighten the Knot: Moisten the knot with saliva or water to reduce friction. Then pull on both the standing line and the tag end to tighten the knot. As you tighten, guide the twists to stack neatly without overlapping.
- Trim the Excess Tag End: Once the knot is fully tightened and secure against the eye of the hook, trim the excess tag end close to the knot.
THE IMPORTANCE OF PRACTICING YOUR KNOTS
Practicing knot tying is an essential skill for any angler, playing a critical role in the overall success and enjoyment of their fishing experience. Firstly, the ability to tie knots quickly and correctly can significantly increase the efficiency of your fishing. Time spent struggling with knots on the water is time not spent casting and potentially catching fish. Moreover, being proficient in a variety of knots allows you to adapt to different fishing situations and conditions. Whether you need a strong knot for a big fish, a discreet knot for clear waters, or a quick change of your setup due to changing conditions, knowing how to tie the right knot makes a big difference.
Beyond efficiency and adaptability, the reliability of your knots directly impacts your success rate in landing fish. A poorly tied knot is one of the main reasons for losing fish. This can be particularly frustrating after spending hours trying to get a bite. Regular practice ensures that your knots are strong and secure, reducing the likelihood of a knot failing at a critical moment. Furthermore, practicing knots enhances your understanding of the strengths and weaknesses of each type, helping you to choose the most appropriate knot for each scenario. In essence, knot tying is not just a skill, but an art that, when mastered, significantly enhances the angler's connection to the sport, fostering a deeper appreciation and respect for the intricacies of fishing.
Practicing knot tying is crucial for several reasons:
- Confidence: Knowing you have securely tied knots boosts your confidence on the water.
- Efficiency: The ability to quickly tie knots means more time fishing and less time fiddling with your gear.
- Strength: Properly tied knots maintain the strength of your line, reducing the risk of losing a fish due to a faulty knot.
WHY YOU SHOULD KNOW ALL THESE KNOTS
Each knot serves a specific purpose and knowing a variety of knots allows you to adapt to different fishing situations. Whether you're changing your tippet, attaching a new fly, or setting up a new line, the right knot makes all the difference.


